Pre-camp setup guide
Setup takes 45 to 60 minutes across four guided phases. Do it early: the Discord #setup-help channel and your buddy group are there to unblock you before the first workshop. This guide is shared on 23 September, and any setup issues are discussed offline on Discord.
Everything in this guide is the four boxes on top: account, tools, coding agent, environment. Building the agent and running it happen on the first Saturday, in Lab 1. If you finish the four phases, you are ready.
The whole camp is designed to fit well inside Google's $300 free trial credit (90 days). You'll set a real spend cap, not just an email alert, in Phase 1 so nothing surprises you.
Google asks for a credit or debit card to verify identity when you start the free trial. You are not charged during the trial, and it does not auto-charge when the trial ends without you upgrading.
All model calls in this camp, including image generation, go through Agent Platform inside your GCP project, so they're covered. If you ever grab a standalone API key from aistudio.google.com, that's a different account with its own billing (Google is moving it to a mandatory prepaid balance from September 2026). Don't put a card on that one.
You'll code with Google Antigravity by default (Claude Code or AGY CLI also work; the labs give you prompts and checkpoints, not code). Any AI IDE accounts, quotas or subscriptions are your own responsibility. The camp only uses your GCP credit for cloud resources.
You need WSL 2. Open PowerShell as Administrator, run wsl --install, restart your computer, then launch the Ubuntu terminal. Run every command in this guide inside that Ubuntu terminal.
DevCamp uses Application Default Credentials (gcloud auth application-default login) and IAM impersonation. You will never need to create, download or manage sensitive .json key files.
Cloud & budget foundation
Create your GCP project and configure a spend cap so you can never be unexpectedly billed.
- Go to cloud.google.com/free and start the free trial with a Google account. A personal Gmail is fine; work accounts often have restrictions, so avoid them.
- In the top navbar project dropdown, click New Project and create a project named
ai-devcamp-<yourname>. Google adds a numeric suffix to make the Project ID unique, for exampleai-devcamp-sonika-509210. Write down your Project ID: every command and setting below uses the ID, not the name (find it on the console dashboard's project info card, or in the project dropdown). From here on it is written<PROJECT_ID>. Leave Location as "No organization" if prompted. Projects are global metadata containers in Google Cloud, so you won't see a region selector here.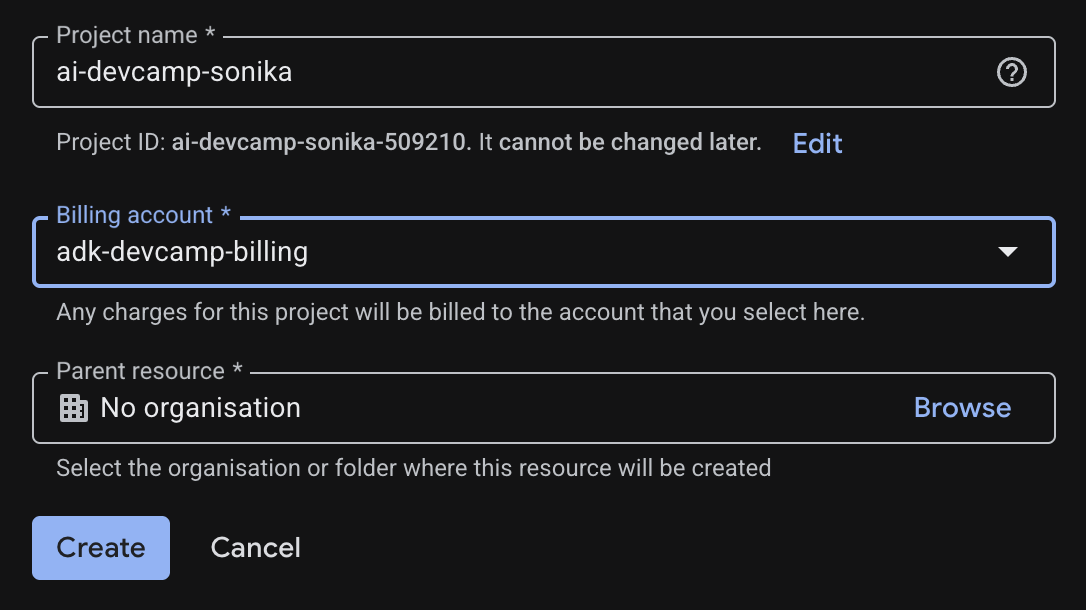
Creating the project and finding its Project ID - Verify your billing account is linked to your new project (console → Billing → My Projects).
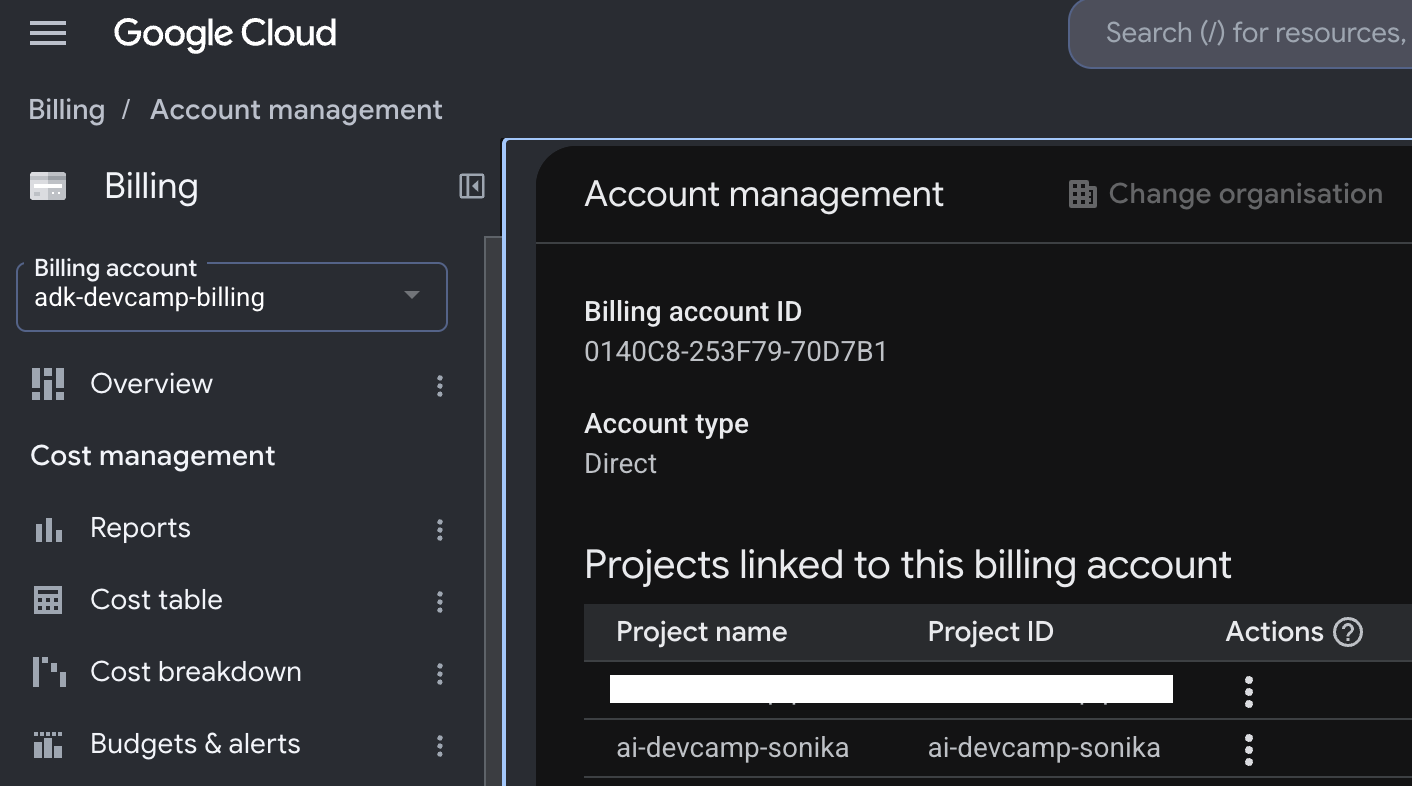
Billing account linked to the project - Enable the required APIs: Agent Platform, Cloud Run, Cloud Build, Sensitive Data Protection, Model Armor, Discovery Engine, Cloud Resource Manager and App Hub. Search for them under APIs & Services → Enable APIs and Services, or run the one-line
gcloudcommand in Phase 2 right after installinggcloud. - Set a spend cap (console → Billing → Budgets & alerts). Create a budget scoped to your
ai-devcamp-<yourname>project with alert thresholds at 50, 80 and 100%, and turn on the spend-cap option scoped to the Agent Platform / Gemini API service (currently in preview).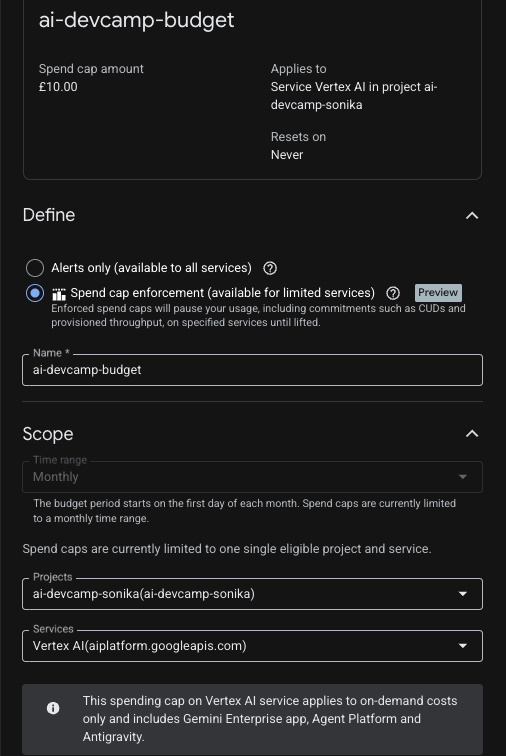
The spend-cap option 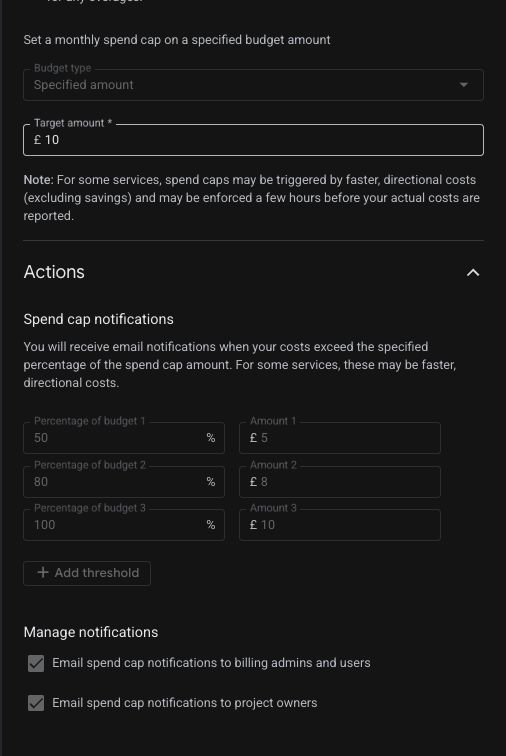
The budget amount
A plain email alert doesn't stop anything. The spend cap actually pauses further Agent Platform usage once you hit 100%. That is the one you want.
The Agent Platform page in the console loads without an "enable API" prompt, and Budgets & alerts shows your budget with the spend cap enabled.
Local developer tools
Get your command line talking to Google Cloud, configure your default deployment region, and install ADK development tools.
Install, in order. Windows users: run all of these inside the Ubuntu (WSL) terminal.
- uv, the Python package manager:
curl -LsSf https://astral.sh/uv/install.sh | sh- Node.js 20+, installed through
nvm:
curl -o- https://raw.githubusercontent.com/nvm-sh/nvm/v0.40.1/install.sh | bash
exec -l $SHELL
nvm install 20- Python 3.14, installed through
uv— the Google Cloud SDK's own installer needs a Python on yourPATH, so get this in place before it:
uv python install 3.14- Google Cloud SDK (the
gcloudCLI), macOS (Apple Silicon):
curl -O https://dl.google.com/dl/cloudsdk/channels/rapid/downloads/google-cloud-cli-darwin-arm.tar.gz
tar -xf google-cloud-cli-darwin-arm.tar.gz
./google-cloud-sdk/install.sh
exec -l $SHELL
gcloud init
On an Intel Mac, swap the filename for google-cloud-cli-darwin-x86_64.tar.gz.
Linux / WSL (Ubuntu/Debian):
sudo apt-get update
sudo apt-get install -y apt-transport-https ca-certificates gnupg curl
curl https://packages.cloud.google.com/apt/doc/apt-key.gpg | sudo gpg --dearmor -o /usr/share/keyrings/cloud.google.gpg
echo "deb [signed-by=/usr/share/keyrings/cloud.google.gpg] https://packages.cloud.google.com/apt cloud-sdk main" | sudo tee -a /etc/apt/sources.list.d/google-cloud-sdk.list
sudo apt-get update && sudo apt-get install -y google-cloud-cli
gcloud init
Other platforms (Windows without WSL, non-Debian Linux): docs.cloud.google.com/sdk/docs/install-sdk.
- Authenticate
gcloudand enable the APIs:
gcloud auth login
gcloud auth application-default login
gcloud config set project <PROJECT_ID>
gcloud config set compute/region us-central1
# Lets your local credentials bill API calls to your project (avoids 403s on a new account):
gcloud auth application-default set-quota-project <PROJECT_ID>

# Enable all required APIs in one command:
gcloud services enable \
  aiplatform.googleapis.com \
  run.googleapis.com \
  cloudbuild.googleapis.com \
  artifactregistry.googleapis.com \
  secretmanager.googleapis.com \
  dlp.googleapis.com \
  modelarmor.googleapis.com \
  discoveryengine.googleapis.com \
  cloudresourcemanager.googleapis.com \
  apphub.googleapis.com \
  agentregistry.googleapis.com \
  networkservices.googleapis.com \
networksecurity.googleapis.comGit and a GitHub account. In Lab 1 you'll fork the starter repo to your own GitHub account, then clone your fork at the starter tag: the web frontend, the LinkedIn MCP server and the Agent Skills come prebuilt, and you build the agent backend. Nothing to run now — this is just so the commands are familiar on Saturday:
- Fork github.com/sonikajanagill/ai-devcamp-labs into your own account (top-right Fork button).
- Clone your fork at the
startertag:
git clone --branch starter --single-branch https://github.com/<your-username>/ai-devcamp-labs.git
cd ai-devcamp-labs
git checkout -b my-work
Cloning a tag (not a branch) leaves you in detached HEAD, so the last line cuts a real branch to work and commit on. Swap <your-username> for your GitHub handle.
ADK: nothing to install now. The starter repo pins an exact ADK version; Lab 1 installs it with uv sync and runs it as uv run adk .... Please don't install ADK globally, so everyone runs the same version.
Regions in Google Cloud are chosen when you deploy each service, not when you create the project. All workshops in this camp deploy to us-central1, the one location we tested end to end. The Semantic Governance Policy Engine (used in Session 3, Govern) is not available in global or europe-west2 (verified directly). Google's documentation lists these supported locations: us-central1, us-east1, us-east4, us-west1, europe-southwest1, europe-west1, europe-west4, europe-west8. We have only tested us-central1. A Governance Policy binds to an Agent Registry entry in whatever region the engine was deployed to, so stay in one region.
Run these in one go — each should return a sensible answer (versions print, and the last line shows your <PROJECT_ID>):
gcloud --version
uv --version
uv python list --only-installed
node --version
gcloud config get-value projectCoding agent setup & ADK superpowers
Set up Google Antigravity with your Google Cloud Agent Platform project budget and install ADK skills.
- Download and launch Google Antigravity.
- Sign in through the Business Account (Google Cloud Project) pathway.
- Select the Business pathway. When logging in (or back in, if you previously used a personal or Pro account), do not choose "Continue with Google". Choose Business Account, or the option that says "Use Google Cloud project instead" or "Continue with Google Cloud".
- Authenticate. Even though it says "Business", your browser opens Google's standard sign-in. Use your personal Gmail, or whichever account owns your project.
- Link your project and budget. The extension asks for:
- Google Cloud Project ID: your
<PROJECT_ID>(the ID, not the name), the project holding your Agent Platform budget. - Location:
Global. - Select License / Agent Platform: if you see "No license available for this project and location", click "Use Agent Platform instead — Pay as you go provisioned for your Google Cloud project".
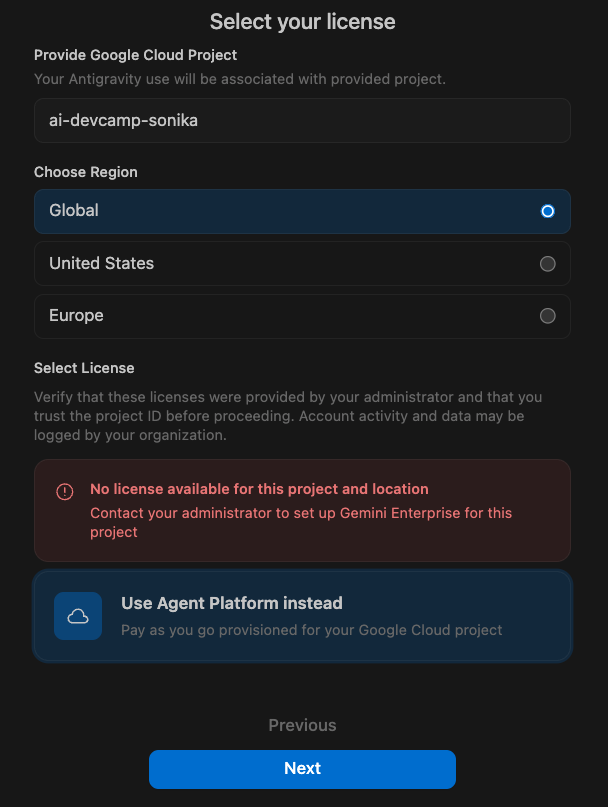
Select License: use Agent Platform instead - Google Cloud Project ID: your
- Verify your account tier. Open Account Settings. Your plan should read Your Plan: Agent Platform (pay as you go), linked to your Project ID and Gmail. All token use from your IDE is billed to the budget on your GCP project.
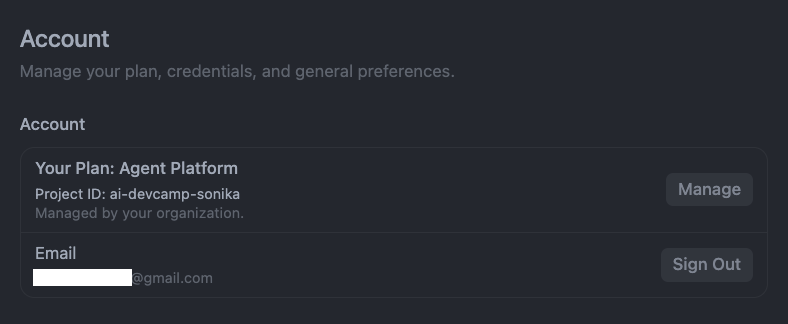
Account Settings showing the Agent Platform plan
If Antigravity says "Agent Platform API has not been used in project <PROJECT_ID> before or it is disabled":
Fix: click the link in the error message to enable the Agent Platform API (aiplatform.googleapis.com), or run gcloud services enable aiplatform.googleapis.com. Wait 2 to 3 minutes for it to propagate, then retry.
IAM permissions: your Google account needs Agent Platform User (roles/aiplatform.user), Owner or Editor on your GCP project.
- Optional second backup: a free-tier key from aistudio.google.com (no card, no billing setup). It's rate-limited but enough to get through a stall, and it's separate from your $300 credit. Do not enable Prepay or billing on that account.
- Prefer another coding agent (Claude Code, AGY CLI)? Fine. The labs give you the prompt to type and the result to check, not the code, so any agent works.
- Teach your coding agent about ADK. One command, worth more than it looks:
uvx google-agents-cli setupThis installs Google's agents-cli (so from here on the labs run plain agents-cli ..., not uvx) and detects which coding agents you have (Antigravity, Claude Code, Cursor, Windsurf…), then installs a set of ADK development skills into each one. Every lab works by you prompting your coding agent to build something, and this is what makes its answers match current ADK instead of whatever its training data remembers. Add --dry-run first to see what it would change, or --workspace to install into the project folder rather than globally.
These are skills for the AI that writes your code. They're a different thing from the Agent Skills in the starter repo's skills/ folder, which are instructions your agent loads at runtime. You'll build with those in Lab 1.
- Antigravity displays your plan as Agent Platform (pay as you go).
- Ask Antigravity to create a hello-world Python file; review its plan, accept, run it.
agents-cli --versionreturns a version. In Antigravity's chat panel ask "What ADK skills do you have?". It should list severalgoogle-agents-cli-*entries (likeadk-code,adk-dev-guide).
Environment, buddy check & camp readiness
Confirm your environment variables, verify setup with your buddy, and prep social tools.
1. Environment variables
There are two: the backend's at backend/social_poster/.env, the frontend's at frontend/.env.local. Both live inside the repo you clone in Lab 1, so neither exists until the workshop starts. Lab 1 walks you through copying each .env.example into place. What matters now is knowing the backend's four core values and why they're what they are, especially GOOGLE_CLOUD_LOCATION, the single most common cause of a 404 on the first model call.
Backend — these are the values you'll put in backend/social_poster/.env:
GOOGLE_GENAI_USE_VERTEXAI=TRUE
GOOGLE_CLOUD_PROJECT=<PROJECT_ID>
GOOGLE_CLOUD_LOCATION=global
DRY_RUN=true
DRY_RUN=true means the LinkedIn posting tool logs posts instead of publishing. Nobody posts anything by accident in this camp.
Frontend — frontend/.env.local holds the web app's own settings, separate from the backend's: a NEXT_PUBLIC_GOOGLE_CLIENT_ID for Google Sign-In, and (only if you deploy the agent later) the Agent Runtime URL it should call instead of your local backend. Lab 1 gives you the values to fill in; there's nothing to note down now.
A 404 "Publisher model not found" usually means the location: regional Agent Platform endpoints such as europe-west1 and europe-west2 can lag behind global for the newest models (confirmed by direct testing). It can also mean the model name itself: the gemini-flash-latest alias started returning 404 everywhere on 2026-10-02, so this project pins real names such as gemini-2.5-flash.
It is unrelated to Phase 2's us-central1 (Agent Runtime and Governance Policies) and to Model Armor's region in Session 3. Those settings are independent. See the diagram in Phase 2.
2. Buddy check
You'll be placed in a small buddy group in Discord before the first workshop. Before Saturday, post your checkpoint results from Phases 1 to 3 in your group thread and confirm one buddy's results in return. Broken setups get fixed in the group or on Discord, not during the workshop.
3. Recommended before Saturday
- Buffer account. Lab 1 publishes through Buffer's MCP server. Create a free Buffer account and connect at least one channel (a LinkedIn profile is fine). No card is needed for the free tier. You'll grab the API key during the lab.
- LinkedIn Developer app (optional bonus step in Lab 1; everything else works through Buffer or in dry-run). Skip it if you're short on time; a guide is linked from the lab.
- GCS image hosting for Buffer (optional and advanced, not part of Lab 1's taught steps, which keep Buffer text-only by design). Only relevant if you want Buffer posts to carry an image like the reference build does. It needs a one-time IAM setup outside the app's own reach: a dedicated service account with signing rights via impersonation, not a downloaded key. Set
GOOGLE_CLOUD_PROJECTandGCS_BUCKET_NAMEin your.env, then run./gcp-setup.shfrom the repo root. Skip this unless you're specifically extending past Lab 1. - Join the GDG London Discord (discord.gg/952SuUXME) and say hi in
#introductions. Channels:#setup-help,#session-1to#session-4,#show-your-use-case. - Think of one use case of your own: an agent you'd like to exist. You'll declare it in Lab 1 and build it alongside ours as each lab's Assignment.
- Optional: see Google's own scaffold. Curious what
agents-cligenerates? In a scratch folder (not the workshop repo), runagents-cli create my-agent --prototype --yes. The labs use our own project, so treat this as a look around. It is also the best test that everything above works: the scaffold uses your gcloud project, and you run it withcd my-agent && agents-cli install && agents-cli playground.
Your four .env values are written down and your buddy check is posted. If you tried the scaffold above, agents-cli playground opens a chat and your first message gets a reply. A 404 "Publisher model ... was not found" means GOOGLE_CLOUD_LOCATION is still set to a region, not global.
You're ready. Here's what's next.
Four phases done means you can start Lab 1 on Saturday without setup getting in the way.
The running use case you'll build
An agent that turns your idea into a formatted social post: it researches the web, drafts with Agent Skills, generates an image, waits for your approval in a proper web UI, and publishes via MCP. Built in Lab 1, made production-ready across Labs 2 to 4.
Schedule
| Session | Thursday (theory, 1hr) | Saturday (workshop, 2hr) | Pillar |
|---|---|---|---|
| Kickoff | 23 Sept, 6–9pm, hybrid: Skyscanner + online | — | Series overview + trends |
| 1 | 24 Sept | 26 Sept | Build |
| 2 | 1 Oct | 3 Oct | Scale |
| 3 | 8 Oct | 10 Oct | Govern |
| 4 | 15 Oct | 17 Oct | Optimise |
- Ask your buddy group, then search
#setup-help. Someone has probably hit it. - Post your OS, the exact command and the exact error.
- Still stuck on Saturday? Pair with a buddy. Broken environments follow along on the instructor project and fix after.