In Part 2A, I showed you why Workload Identity Federation (WIF) is the Zero-Trust solution for multi-cloud MLOps. We covered the business case, the security benefits, the cost savings.
Now let's build it.
I've implemented this pattern multiple times and each time, I hit the same gotchas, solved the same "Permission Denied" errors, and learned new tricks.
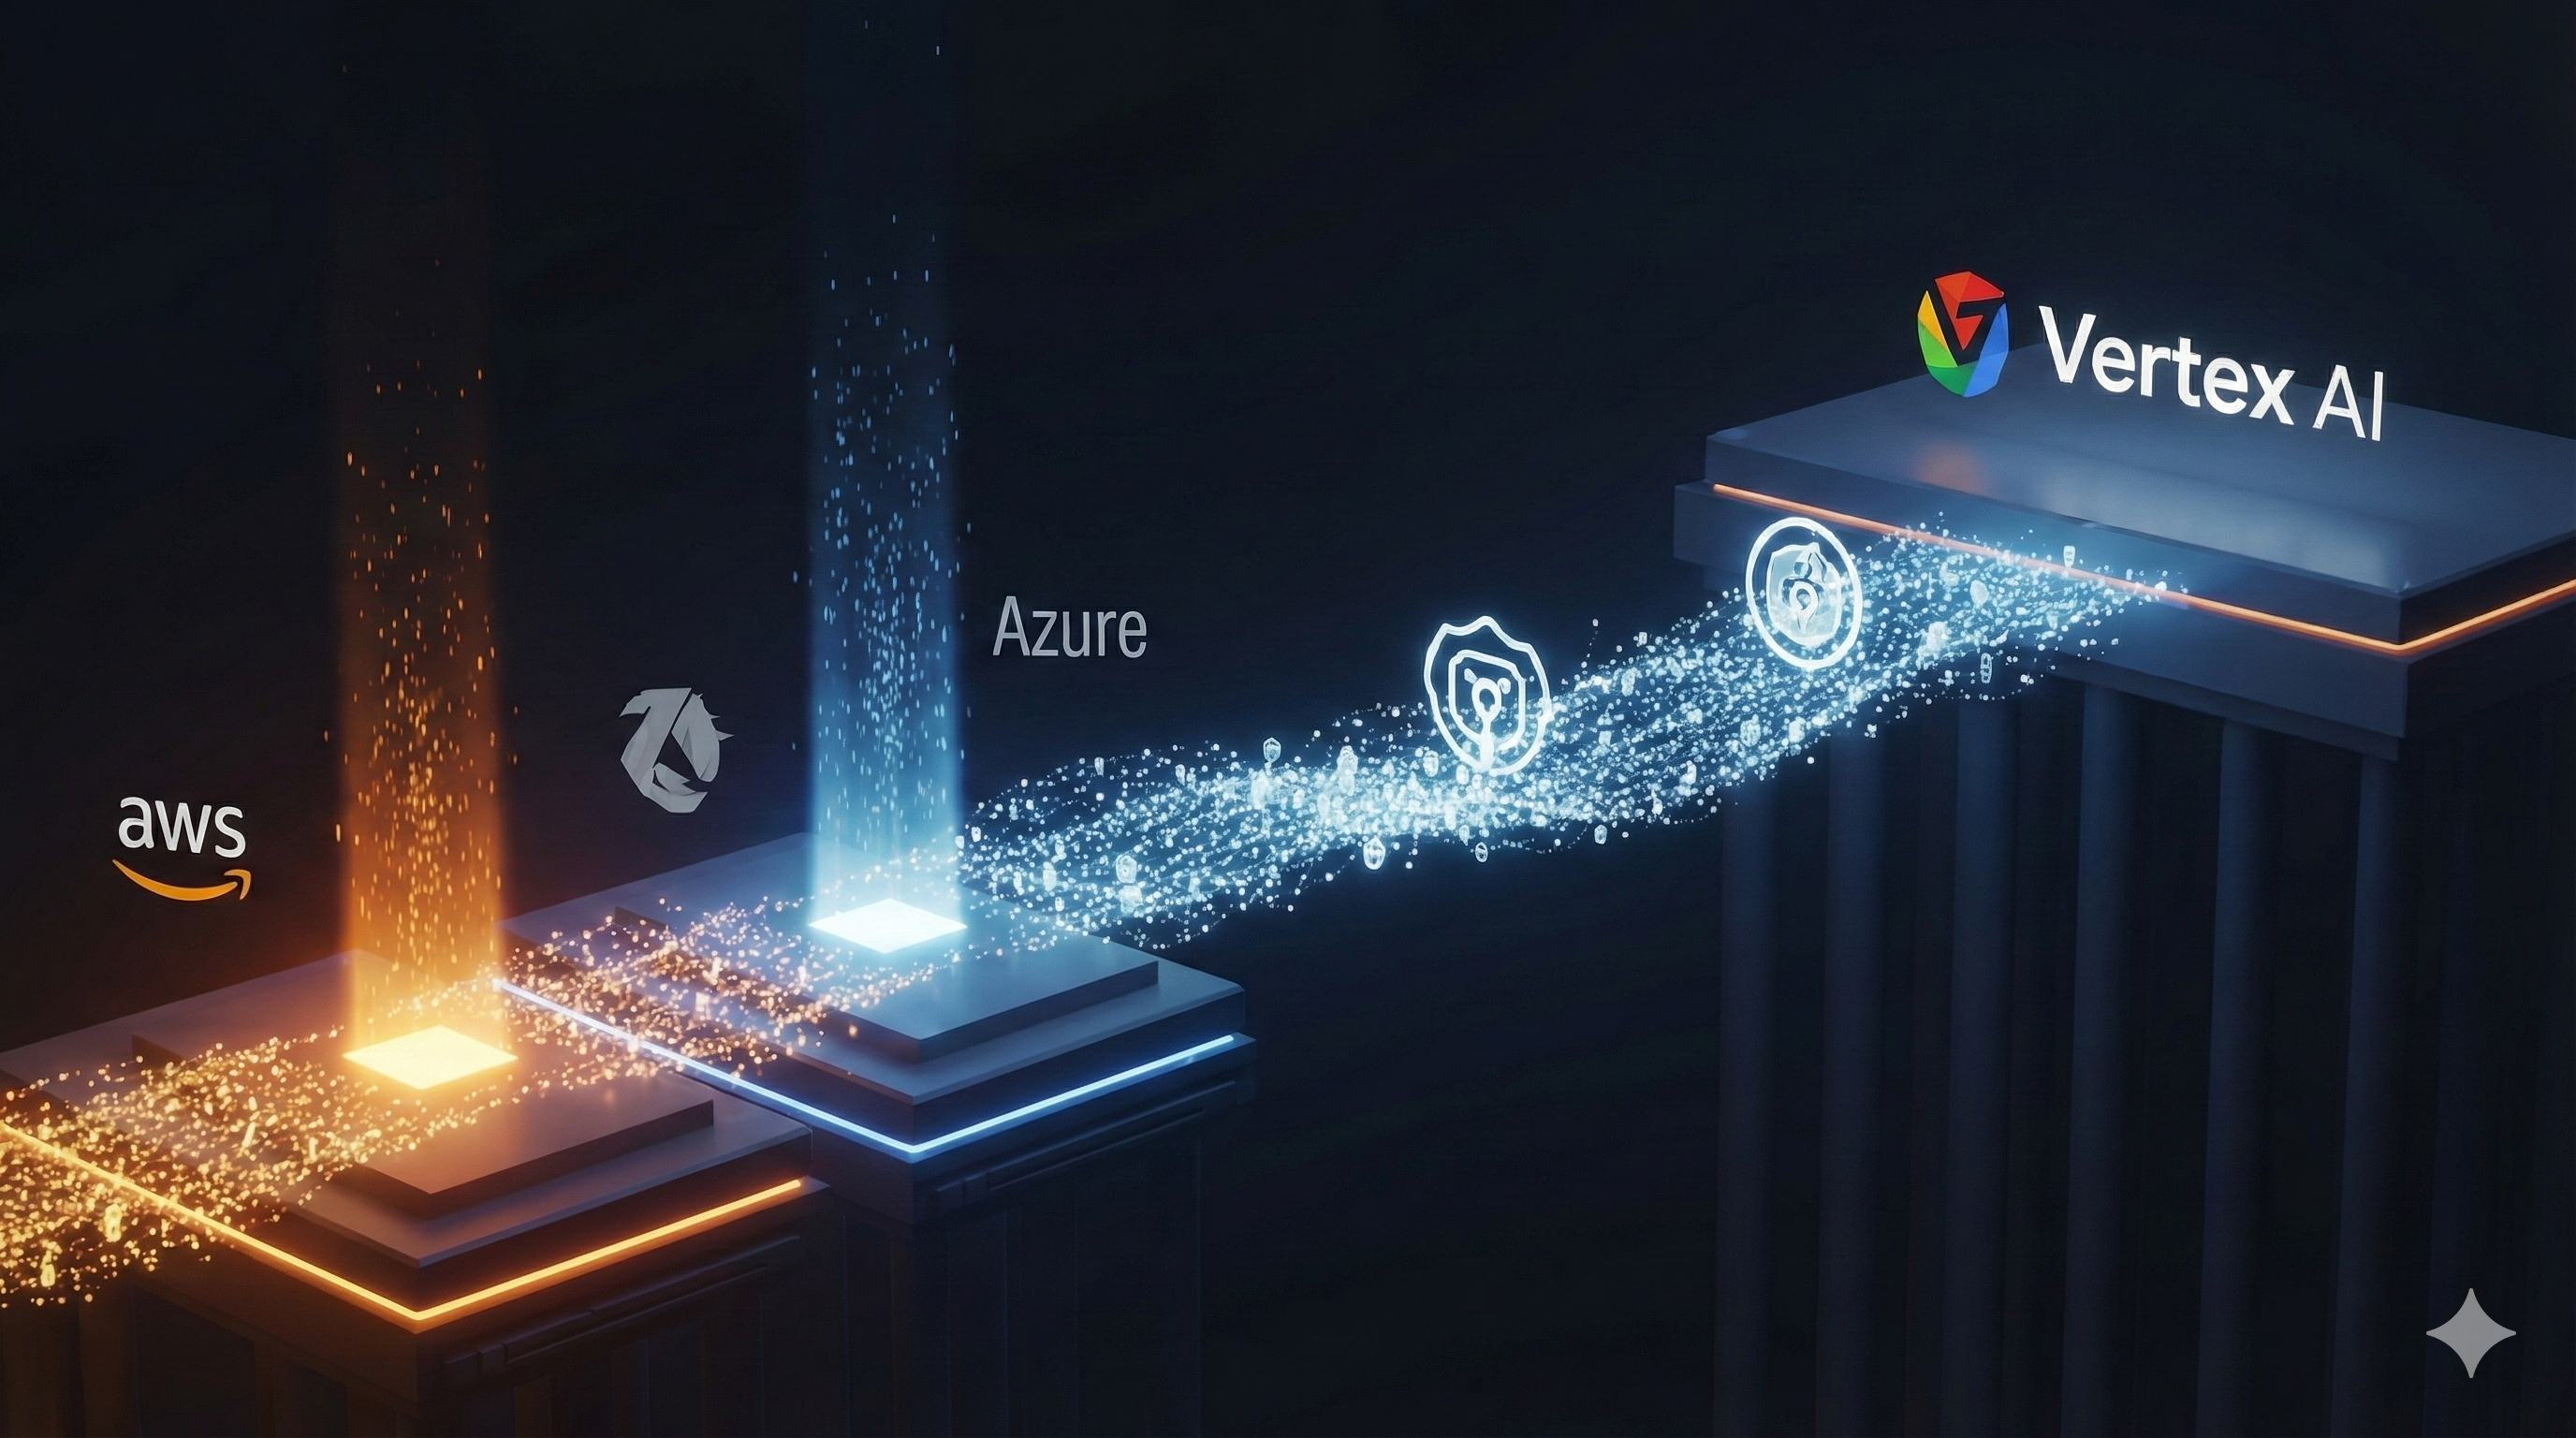
This is the implementation guide I wish I'd had for my first setup. It would have saved me 10 hours of debugging. We are going to build a production-ready, keyless authentication pipeline from AWS to Vertex AI, adaptable for Azure and GitHub Actions. We will cover:
- The Core Setup: A complete AWS → Vertex AI implementation in 15 minutes.
- The Enterprise Pattern: Moving multi-TB datasets using Storage Transfer Service (STS) without proxying data.
- The Compliance Pattern: Azure to Vertex AI for HIPAA-regulated workloads.
- Troubleshooting: How to debug the dreaded "Permission Denied" errors.
If you just want to test WIF works, skip to Phase 3 and use the Standard Pattern with a small test file. Come back for the enterprise patterns later.
WIF Architecture: Understanding the Core Components
Before we run Terraform, let's visualise the components. When I implemented this for the first time, I made the mistake of jumping straight into creating resources. I ended up with a mess of permissions that took 3 hours to untangle.
Here's the mental model that finally clicked for me:
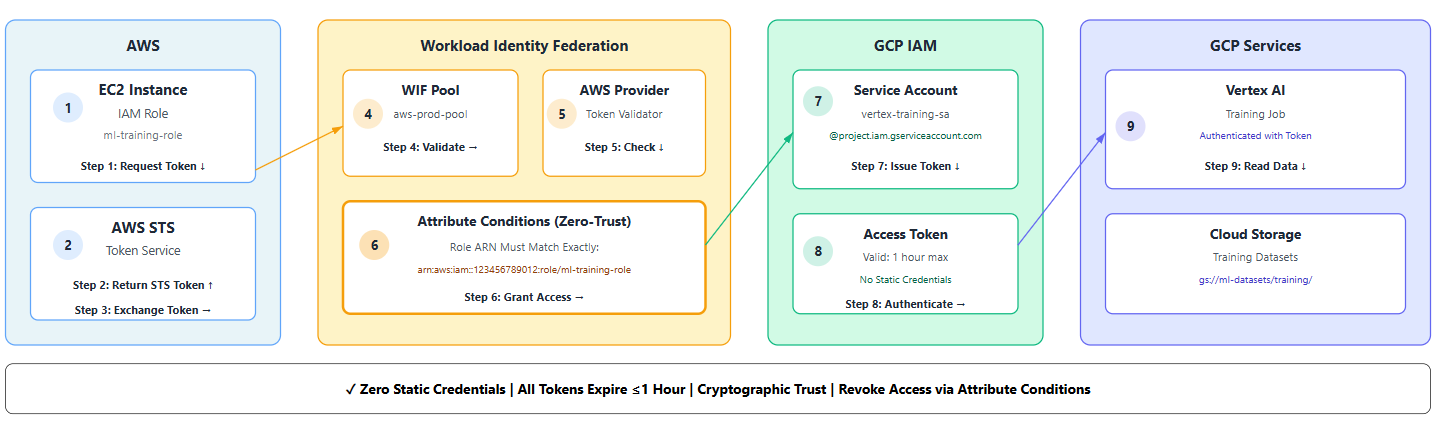
The 8-Step Trust Dance
- AWS Identity Token: Your EC2 instance requests its identity from AWS STS
- Token Retrieval: AWS issues a signed token proving "I am IAM role X in account Y"
- Token Exchange: Your app presents this AWS token to GCP's Workload Identity Pool
- Provider Validation: The AWS Provider validates the token signature
- Attribute Checking: Conditions verify the role ARN matches your allowed list
- Service Account Impersonation: If checks pass, GCP issues a short-lived token for your service account
- Resource Access: Your code uses this token to call Vertex AI APIs
- Data Operations: Vertex AI accesses Cloud Storage with the service account's permissions
Key Components
- Workload Identity Pool: The container for external identities (e.g.,
aws-prod-pool). - Pool Provider: The "bouncer" that verifies tokens (e.g., checks if the AWS token is valid).
- GCP Service Account: The identity your external workload impersonates after passing the bouncer.
- Attribute Conditions: The fine-grained rules (e.g., "Only allow access if the AWS role is
ml-training-role").
Notice how zero static credentials flow through this system. Every token is short-lived (1 hour max), and if your AWS role is compromised, you just remove it from the attribute conditions.
Pattern 1: AWS to Vertex AI Authentication (15-Minute Setup)
Scenario: You have training data in AWS S3, model training on Vertex AI. This is the most frequently used pattern implementation.
Time to implement: 15-20 minutes for first-time setup, 10 minutes once you know the steps.
We'll do this in three phases:
- GCP Configuration - Tell Google who to trust (5 min)
- AWS Configuration - Give AWS permission to request tokens (5 min)
- Application Code - Use the credentials seamlessly (5 min)
Let's start with the GCP side.
Phase 1: GCP Configuration (The Trust Side)
First, we tell Google Cloud to trust specific AWS identities.
1. Create the Workload Identity Pool
This acts as a namespace for your external identities.
export PROJECT_ID="your-ml-project"
export POOL_ID="aws-prod-pool"
export LOCATION="global"

gcloud iam workload-identity-pools create $POOL_ID \
  --project=$PROJECT_ID \
  --location=$LOCATION \
  --display-name="AWS Production ML Workloads" \
  --description="Federated access for AWS-based ML pipelines"
2. Create the AWS Provider
This links your specific AWS Account ID to the pool.
export PROVIDER_ID="aws-provider"
export AWS_ACCOUNT_ID="123456789012"  # Replace with your AWS Account ID

gcloud iam workload-identity-pools providers create-aws $PROVIDER_ID \
  --project=$PROJECT_ID \
  --location=$LOCATION \
  --workload-identity-pool=$POOL_ID \
  --account-id=$AWS_ACCOUNT_ID
3. Create the Service Account & Grant Permissions
This is the identity your AWS workload will "become."
export SA_NAME="vertex-training-sa"

# Create the Service Account
gcloud iam service-accounts create $SA_NAME \
  --project=$PROJECT_ID \
  --display-name="Vertex AI Training Agent"

# Grant it access to Vertex AI and GCS
gcloud projects add-iam-policy-binding $PROJECT_ID \
  --member="serviceAccount:$SA_NAME@$PROJECT_ID.iam.gserviceaccount.com" \
  --role="roles/aiplatform.user"

gcloud projects add-iam-policy-binding $PROJECT_ID \
  --member="serviceAccount:$SA_NAME@$PROJECT_ID.iam.gserviceaccount.com" \
  --role="roles/storage.objectViewer"
4. Bind the Trust (The Critical Step)
This is where we say: "Allow the ml-training-role from the AWS Account 123... to impersonate this Service Account."
# Get the full pool resource name
POOL_RESOURCE_NAME=$(gcloud iam workload-identity-pools describe $POOL_ID \
  --project=$PROJECT_ID --location=$LOCATION --format="value(name)")

# Allow impersonation ONLY from a specific AWS Role
gcloud iam service-accounts add-iam-policy-binding \
  "$SA_NAME@$PROJECT_ID.iam.gserviceaccount.com" \
  --role="roles/iam.workloadIdentityUser" \
  --member="principalSet://iam.googleapis.com/$POOL_RESOURCE_NAME/attribute.aws_role/arn:aws:iam::$AWS_ACCOUNT_ID:role/ml-training-role"
Pro Tip: Being specific with attribute.aws_role here is what makes this Zero-Trust. Never use a wildcard (*) in production.
Phase 2: AWS Configuration (The Client Side)
Now, we configure AWS to provide the credentials.
1. Create the IAM Role
This role will be assumed by your EC2 instance or EKS pod. It needs a trust policy that allows it to talk to Google.
Important: This trust policy goes in your AWS IAM role definition, NOT in GCP. This is what allows AWS to issue tokens that GCP will accept.
trust-policy.json:
{
  "Version": "2012-10-17",
  "Statement": [
    {
      "Effect": "Allow",
      "Principal": {
        "Federated": "accounts.google.com"
      },
      "Action": "sts:AssumeRoleWithWebIdentity",
      "Condition": {
        "StringEquals": {
          "accounts.google.com:aud": "http://iam.googleapis.com/projects/${GCP_PROJECT_NUMBER}/locations/global/workloadIdentityPools/aws-prod-pool/providers/aws-provider"
        }
      }
    }
  ]
}
2. Configure the Client Library
Google's client libraries need a configuration file to know how to perform the exchange. You generate this once and bake it into your application image or mount it as a Kubernetes secret.
gcloud iam workload-identity-pools create-cred-config \
  projects/$PROJECT_NUMBER/locations/global/workloadIdentityPools/$POOL_ID/providers/$PROVIDER_ID \
  --service-account="$SA_NAME@$PROJECT_ID.iam.gserviceaccount.com" \
  --aws \
  --output-file="credential-config.json"
Phase 3: The Vertex AI Pipeline Code
This is where the magic happens. We will look at two patterns: the Standard Pattern for small data, and the Enterprise Pattern for massive datasets.
Common Setup
In your Python script running on AWS, simply point to the config file.
import os
os.environ['GOOGLE_APPLICATION_CREDENTIALS'] = '/path/to/credential-config.json'
Option A: The "Standard" Pattern (Small Data)
For metadata or small files, you can download to the AWS worker and re-upload to GCS.
def fetch_data_standard(s3_bucket, gcs_bucket):
    import boto3
    from google.cloud import storage

    # 1. Get data from S3 (using AWS native credentials)
    s3 = boto3.client('s3')
    s3.download_file(s3_bucket, 'data.csv', '/tmp/data.csv')

    # 2. Upload to GCS (using WIF credentials automatically)
    storage_client = storage.Client()
    bucket = storage_client.bucket(gcs_bucket)
    blob = bucket.blob('training/data.csv')
    blob.upload_from_filename('/tmp/data.csv')

    return f"gs://{gcs_bucket}/training/data.csv"
Option B: The "Enterprise" Pattern (Multi-TB Data)
If you are moving 2TB of training data, do not proxy it through your worker node. It's slow, expensive, and fragile.
Let me show you why with a visual comparison:
Enterprise Approach: Direct STS Transfer
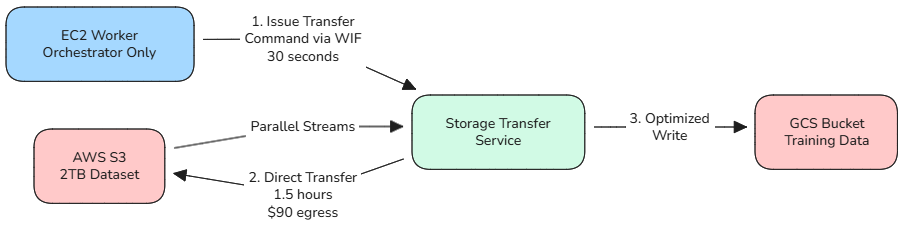
Naive Approach: Proxy Through Worker

The Cost of Getting This Wrong
Naive Approach (Proxy Through Worker):
- Download 2TB from S3 to EC2: 2 hours
- Upload 2TB from EC2 to GCS: 3 hours
- Total time: 5 hours
- AWS egress cost: $180 (S3 → Internet → GCS)
- Single point of failure: Your worker node
- Network instability: Any disconnect = start over
Enterprise Approach (Storage Transfer Service):
- Issue STS transfer command via WIF: 30 seconds
- GCP transfers directly with parallel streams: 1.5 hours
- Total time: 1.5 hours
- AWS egress cost: $90 (S3 → GCP direct peering)
- No worker dependency: STS handles retries automatically
- Bandwidth optimisation: Google's infrastructure, not your EC2 instance
The Architectural Insight
With STS, your worker node becomes a lightweight orchestrator instead of a data proxy. You use WIF credentials to command GCP to fetch the data, then step aside while the platforms handle the heavy lifting.
This is the architect-level distinction: Knowing when to move data yourself, and when to orchestrate the platform to do it for you.
def trigger_enterprise_transfer(s3_bucket, gcs_bucket):
    """
    Triggers a server-to-server transfer from AWS S3 to GCS.
    Zero data flows through this script.
    """
    from google.cloud import storage_transfer

    client = storage_transfer.StorageTransferServiceClient()

    transfer_job = {
        "description": "Enterprise Transfer via WIF",
        "project_id": "your-ml-project",
        "transfer_spec": {
            "aws_s3_data_source": {
                "bucket_name": s3_bucket,
                # STS requires a federated role ARN on the AWS side
                # This is a SEPARATE AWS role specifically for STS
                # It needs s3:GetObject permissions on source bucket
                # And should be listed in the GCP WIF pool's allowed principals
                "role_arn": "arn:aws:iam::123456789012:role/sts-transfer-role"
            },
            "gcs_data_sink": {"bucket_name": gcs_bucket},
        },
        "status": "ENABLED"
    }

    result = client.create_transfer_job({"transfer_job": transfer_job})
    print(f"✓ STS Job Started: {result.name}")
    return result.name
Cost Impact: Using STS instead of proxying saved us $90 in egress costs on a single 2TB transfer. For weekly transfers, that's $4,680/year.
Implementation Pattern 2: Azure to Vertex AI (Healthcare)
Standard WIF is great. But what about regulated industries?
Let me show you how WIF adapts for healthcare compliance. This is the pattern implemented for a diagnostics startup that needed:
- Patient data must stay in Azure (existing HIPAA-compliant environment)
- Training must happen on Vertex AI (AutoML capabilities)
- Zero PHI (Protected Health Information) can touch public internet
- Full audit trail required for compliance
HIPAA Note: CMEK is required for HIPAA workloads on GCP. Combined with WIF, VPC Service Controls, and audit logging, this creates a compliant ML environment. Always consult your compliance team for your specific requirements.
Healthcare compliance adds three layers beyond basic WIF:
1. Data Residency
All patient data stayed in Azure Blob Storage in their compliant region. Only anonymised features crossed the cloud boundary.
2. Network Isolation
We used Cloud Interconnect + VPC Service Controls to ensure data never touched public internet. In retrospect, this was the most complex part of the implementation—it took 2 days to get the routing right.
3. Cryptographic Trail
Every data access had to be auditable. WIF gave us this automatically—each token exchange generated an audit log we could present to regulators.
The Azure Difference
Azure doesn't use the AWS-style federation. It uses OIDC (OpenID Connect).
GCP Side: Create an OIDC Provider
gcloud iam workload-identity-pools providers create-oidc "azure-provider" \
  --workload-identity-pool="azure-health-pool" \
  --issuer-uri="https://sts.windows.net/YOUR_TENANT_ID/" \
  --allowed-audiences="api://AzureADTokenExchange"
Azure Side: Enable Managed Identity
Enable Managed Identity on your VM/AKS cluster.
Compliance Hardening: CMEK
CMEK (Customer Managed Encryption Keys): All ML artifacts encrypted with your own keys for full cryptographic control.
First, create your encryption key:
# Create KMS key ring (one-time setup)
gcloud kms keyrings create healthcare-ml-keyring \
  --location=us-central1 \
  --project=$PROJECT_ID

# Create the encryption key
gcloud kms keys create vertex-artifacts-key \
  --keyring=healthcare-ml-keyring \
  --location=us-central1 \
  --purpose=encryption \
  --rotation-period=90d \
  --next-rotation-time=$(date -u -d "+90 days" +%Y-%m-%dT%H:%M:%SZ)

# Grant Vertex AI permission to use this key
gcloud kms keys add-iam-policy-binding vertex-artifacts-key \
  --keyring=healthcare-ml-keyring \
  --location=us-central1 \
  --member="serviceAccount:service-$PROJECT_NUMBER@gcp-sa-aiplatform.iam.gserviceaccount.com" \
  --role="roles/cloudkms.cryptoKeyEncrypterDecrypter"
Then reference it in your Vertex AI training jobs:
from google.cloud import aiplatform

# Initialize with CMEK configuration
aiplatform.init(
    project='your-healthcare-project',
    location='us-central1',
    encryption_spec_key_name='projects/your-healthcare-project/locations/us-central1/keyRings/healthcare-ml-keyring/cryptoKeys/vertex-artifacts-key'
)

# Training job with CMEK
job = aiplatform.CustomTrainingJob(
    display_name='hipaa-compliant-training',
    container_uri='gcr.io/your-project/training-image:latest',
    model_serving_container_image_uri='gcr.io/your-project/serving-image:latest',
    # This ensures ALL artifacts (model, logs, metadata) use CMEK
    encryption_spec_key_name='projects/your-healthcare-project/locations/us-central1/keyRings/healthcare-ml-keyring/cryptoKeys/vertex-artifacts-key'
)

model = job.run(
    dataset=dataset,
    model_display_name='diagnostic-model-v1',
    # Model registry artifacts also encrypted
    encryption_spec_key_name='projects/your-healthcare-project/locations/us-central1/keyRings/healthcare-ml-keyring/cryptoKeys/vertex-artifacts-key'
)

# Deploy endpoint with CMEK
endpoint = model.deploy(
    deployed_model_display_name='diagnostic-endpoint',
    machine_type='n1-standard-4',
    # Even prediction endpoint artifacts encrypted
    encryption_spec_key_name='projects/your-healthcare-project/locations/us-central1/keyRings/healthcare-ml-keyring/cryptoKeys/vertex-artifacts-key'
)
Why CMEK Matters for Healthcare
Here's how the encryption layers protect your ML pipeline:
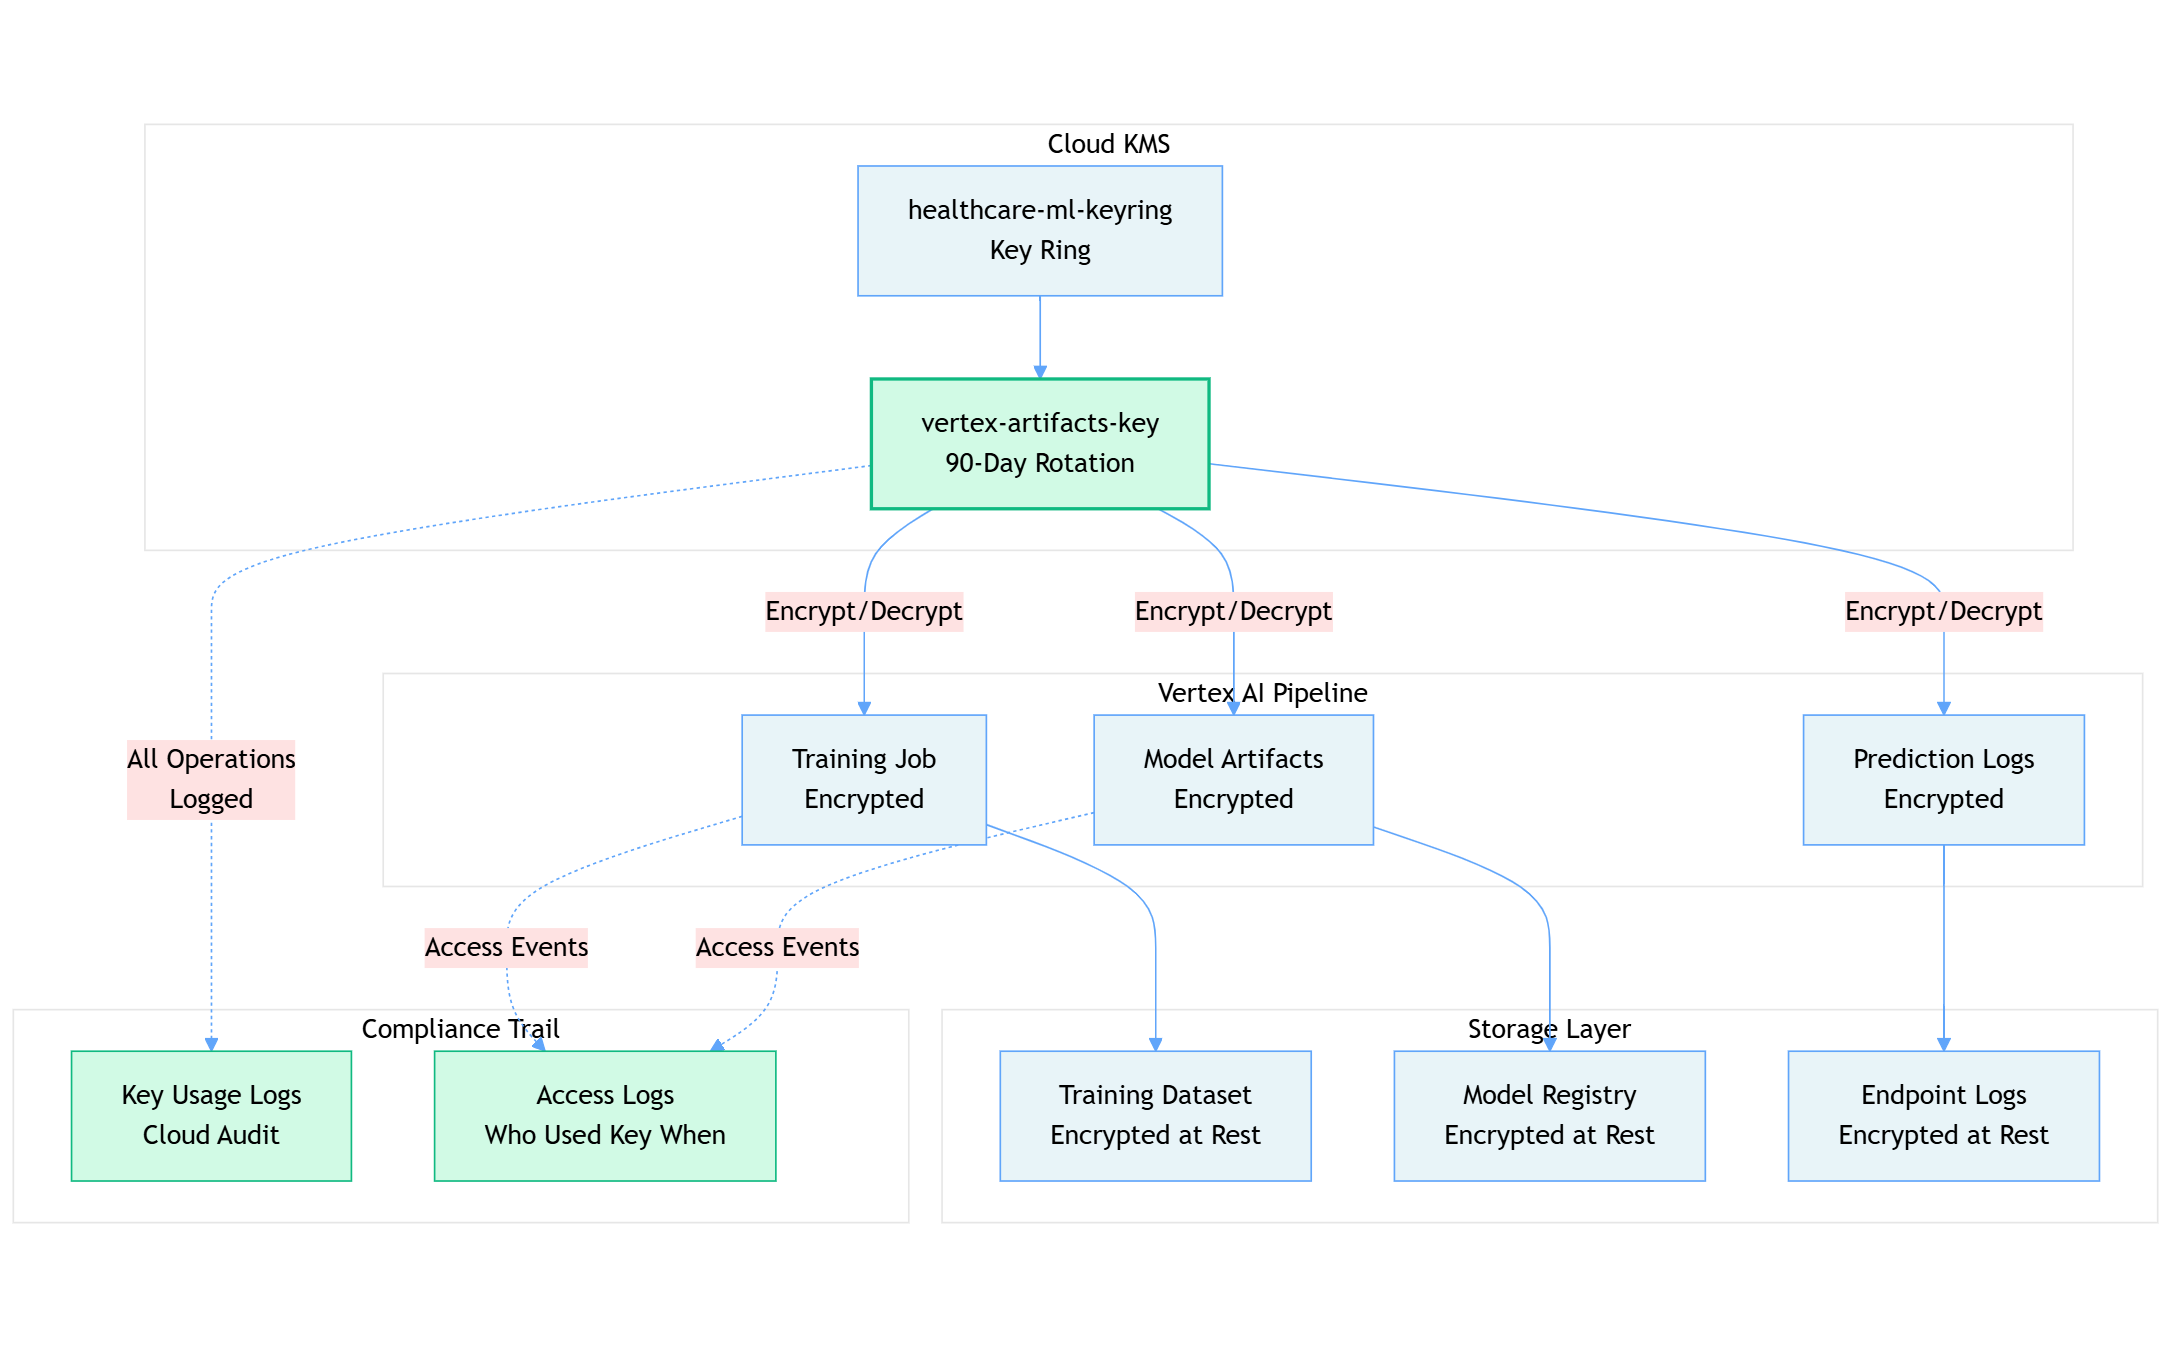
The Compliance Value Chain
For our healthcare client, this architecture meant:
- Cryptographic Control: The customer owns the keys in their KMS, not Google. If they need to revoke access, they disable the key, and all encrypted data becomes immediately inaccessible.
- Automated Rotation: 90-day key rotation satisfies HIPAA requirements without manual intervention.
- Complete Audit Trail: Every time Vertex AI uses the encryption key, it's logged in Cloud Audit Logs with:
- Which service account requested access
- What artifact was encrypted/decrypted
- Timestamp and source IP
- Success or failure status
- Instant Revocation: If a compliance issue arises, disabling the KMS key instantly cuts off all access to training data, models, and predictions.
What Gets Encrypted
- ✓ Training datasets and preprocessing artifacts
- ✓ Model binaries and checkpoints
- ✓ Prediction logs and metadata
- ✓ Explainability reports and feature attributions
The pattern above ensures that even Google engineers cannot access your ML artifacts without your explicit key permissions.
Pro Tip: Use separate keys for different sensitivity levels. We used one key for anonymised features, another for the diagnostic models containing derived PHI.
VPC Service Controls
Wrap your GCP project in a perimeter that blocks all internet egress, allowing traffic only from your trusted Azure range via Private/Interconnect.
Common WIF Errors: Debugging Permission Denied and Token Issues
You've built it. Now let's make sure it works.
I've debugged WIF implementations dozens of times. Here are the three errors you'll almost certainly encounter, and how to fix them in minutes.
Problem 1: "Permission Denied" on Token Exchange
- Symptom:
Error: Permission 'iam.serviceAccounts.getAccessToken' denied - The Fix: You likely forgot the Service Account impersonation binding. Check that your AWS role is exactly matching the attribute condition.
# Debug Command
gcloud iam service-accounts get-iam-policy $SA_EMAIL
Look for roles/iam.workloadIdentityUser.
Problem 2: "Invalid Token"
- Symptom: The exchange fails claiming the AWS token is invalid. The error message is completely unhelpful: "Invalid token format."
- The Fix: Check IMDSv2. AWS now defaults to requiring a "hop limit" of 2 for containerized workloads. If your hop limit is 1, the token cannot be retrieved inside the container.
# Fix on EC2
aws ec2 modify-instance-metadata-options --http-put-response-hop-limit 2 --instance-id ${INSTANCE_ID}
By the third implementation, I just automated this check in Terraform modules.
Problem 3: "Security Token Service API Disabled"
- Symptom: A generic 403 error.
- The Fix: It sounds obvious, but ensure the
sts.googleapis.comandiamcredentials.googleapis.comAPIs are enabled in your GCP project.
Conclusion: Start Small, Scale Securely
You now have the blueprint to eliminate static keys from your infrastructure.
Your Next Steps
- Week 1: Implement the AWS setup in a sandbox environment.
- Week 2: Migrate one non-critical pipeline (e.g., a daily batch job).
- Week 3: Enable "Attribute Conditions" to lock down access to specific roles.
Get the Code
I've published the complete Terraform modules and Python scripts for both the AWS and Azure patterns in my GitHub repository. Star it, fork it, and use it as your template.
GitHub Repo: wif-mlops-patterns
What's Next: From Security to Economics
You now have the security foundation in place—zero static credentials, cryptographic trust, and automated compliance. Your multi-cloud MLOps pipeline is secure.
But security is just one dimension of production readiness. The other critical question: What does this infrastructure actually cost?
In Part 3: Cloud Composer vs. Vertex AI Pipelines, we discussed how to choose the right orchestration layer for your ML workflows. Now it's time to make it cost-efficient.
In Part 4, we'll tackle the economics: Cost-optimised MLOps: Reducing Infrastructure Spend by 80%. I'll show you:
- How I reduced a $3,200/month ML infrastructure bill to $600/month
- The service isolation strategy that unlocked these savings
- Preemptible instances, auto-scaling, and scheduling tactics with real ROI numbers
- A cost optimisation checklist you can apply to your pipelines this week
Because secure pipelines that bankrupt your team aren't sustainable.
Series Navigation
- Part 1: The Hidden Cost of Data Chaos in ML Projects
- Part 2A: Why static credentials are catastrophic + WIF strategy
- Part 2B: Complete AWS + Azure implementation (you are here)
- Part 3: Orchestration decisions - Composer vs Kubeflow
- Part 4: Cost-optimised MLOps: Reducing Infrastructure Spend by 80% (coming soon)
This article is part of the "Enterprise MLOps on GCP" series. Follow me on Medium and LinkedIn for Part 4 and the rest of the series.
Also published on Medium - Join the discussion in the comments!